


PIR sensor interfacing with Ardiuno UNO
PIR sensor interfacing with Ardiuno UNO
How PIR sensor works?
If you didn’t know, all objects with a temperature above Absolute Zero (0 Kelvin / -273.15 °C) emit heat energy in the form of infrared radiation, including human bodies. The hotter an object is, the more radiation it emits.
PIR sensor is specially designed to detect such levels of infrared radiation. It basically consists of two main parts: A Pyroelectric Sensor and A special lens called Fresnel lens which focuses the infrared signals onto the pyroelectric sensor.

A Pyroelectric Sensor actually has two rectangular slots in it made of a material that allows the infrared radiation to pass. Behind these, are two separate infrared sensor electrodes, one responsible for producing a positive output and the other a negative output. The reason for that is that we are looking for a change in IR levels and not ambient IR levels. The two electrodes are wired up so that they cancel each other out. If one half sees more or less IR radiation than the other, the output will swing high or low.
When the sensor is idle, i.e. there is no movement around the sensor; both slots detect the same amount of infrared radiation, resulting in a zero output signal.
But when a warm body like a human or animal passes by; it first intercepts one half of the PIR sensor, which causes a positive differential change between the two halves. When the warm body leaves the sensing area, the reverse happens, whereby the sensor generates a negative differential change. The corresponding pulse of signals results in the sensor setting its output pin high.
PIR sensor Basics :
HC-SR501 PIR sensor has three output pins VCC, Output and Ground as shown in the diagram below. It has a built-in voltage regulator so it can be powered by any DC voltage from 4.5 to 12 volts, typically 5V is used. Other than this, there are a couple options you have with your PIR. Let’s check them out

There are two potentiometers on the board to adjust a couple of parameters:
Sensitivity– This sets the maximum distance that motion can be detected. It ranges from 3 meters to approximately 7 meters. The topology of your room can affect the actual range you achieve.
Time– This sets how long that the output will remain HIGH after detection. At minimum it is 3 seconds, at maximum it is 300 seconds or 5 minutes.
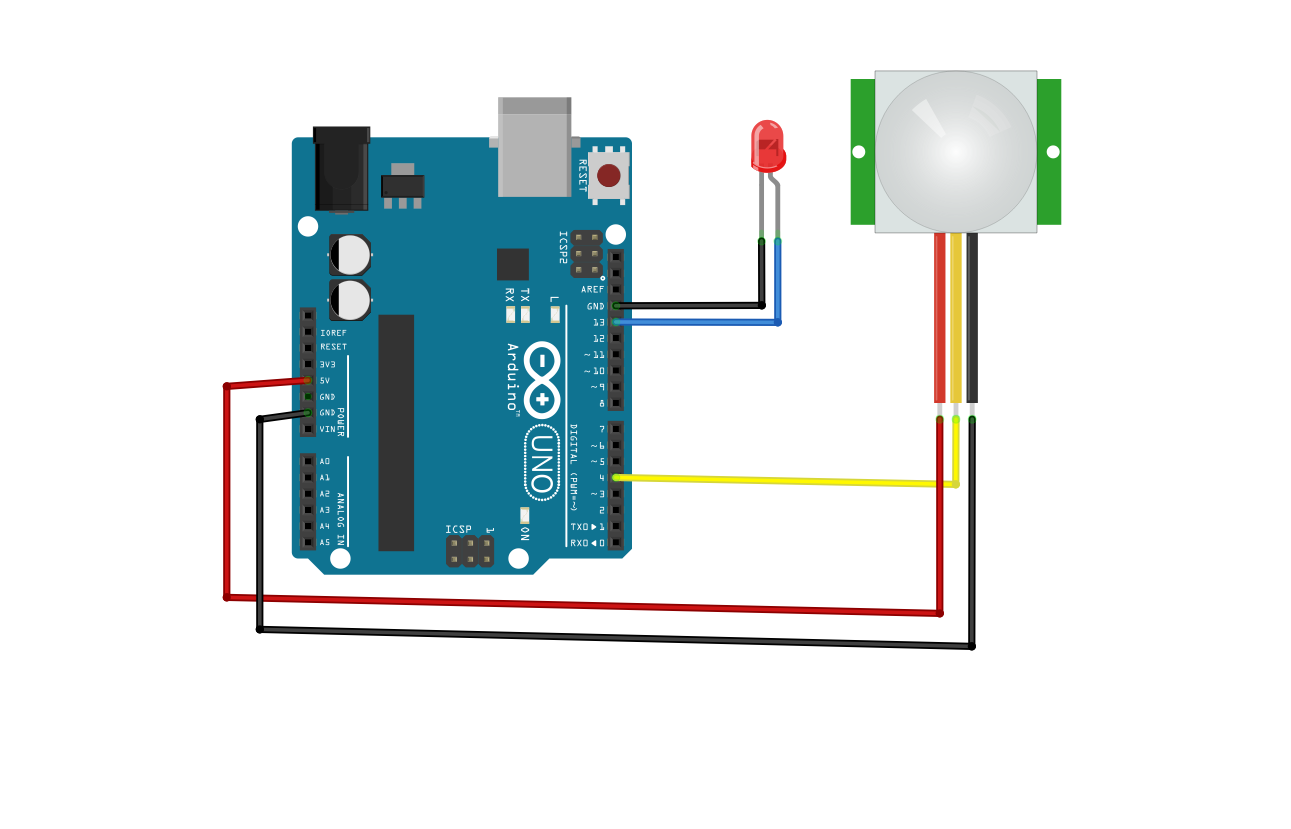
Basic interfacing of PIR sensor with Arduino
The PIR acts as a digital output so all you need to do is listen for the output pin to flip HIGH (Motion Detected) or LOW (Not Detected). Power the PIR with 5V and connect ground to ground. Then connect the output to a digital pin 4
Programming :
The code is very simple, and is basically just keeps track of whether the input to pin 4 is HIGH or LOW
int ledPin = 13; // choose the pin for the LED
int inputPin = 4; // choose the input pin (for PIR sensor)
int pirState = LOW; // we start, assuming no motion detected
int val = 0; // variable for reading the pin status
void setup()
{
pinMode(ledPin, OUTPUT); // declare LED as output
pinMode(inputPin, INPUT); // declare sensor as input
Serial.begin(9600);
}
void loop()
{
val = digitalRead(inputPin); // read input value
if (val == HIGH)// check if the input is HIGH
{
digitalWrite(ledPin, HIGH); // turn LED ON
if (pirState == LOW)
{
Serial.println("Motion detected!"); // print on output change
pirState = HIGH;
}
}
else
{
digitalWrite(ledPin, LOW); // turn LED OFF
if (pirState == HIGH)
{
Serial.println("Motion ended!"); // print on output change
pirState = LOW;
}
}
}
At the end we will print a message on the serial monitor when motion is detected.


No comments: